오늘의 목표
이미지를 업로드하기 위한 페이지를 만들어보자.
이미지는 카메라 촬영, 갤러리에서 가져오기의 기능으로 가져올 것이다.
#1. 업로드 화면 구성
#2. 업로드 화면
#3. 결과 화면
#1. 업로드 화면 구성
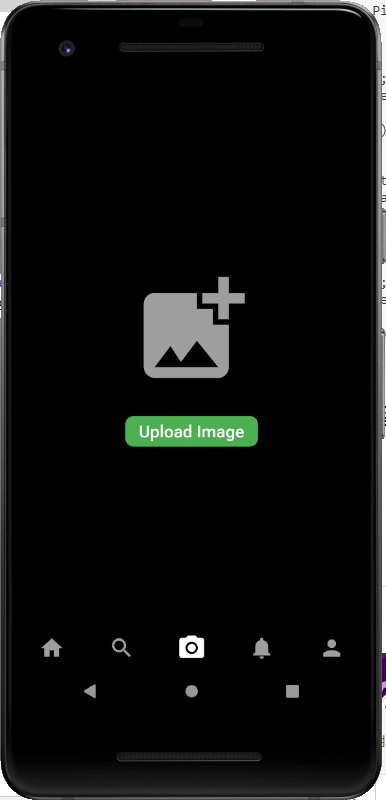
- Upload Image 버튼 클릭
- 사진촬영/갤러리에서 가져오기 기능을 위한 다이얼로그 팝업
- 사진 선택 후 게시를 위한 동작 (share버튼 클릭시)
#2. 업로드 화면
- 업로드화면
displayUploadScreen() {
  return Container(
    child: Column(
      mainAxisAlignment: MainAxisAlignment.center,
      children: <Widget>[
        Icon(Icons.add_photo_alternate, color: Colors.grey, size: 150,),
        Padding(
          padding: EdgeInsets.only(top: 20),
          child: RaisedButton(
            shape: RoundedRectangleBorder(
              borderRadius: BorderRadius.circular(10),
            ),
            child: Text('Upload Image', style: TextStyle(color: Colors.white, fontSize: 20)),
            color: Colors.green,
            onPressed: () => takeImage(context),
          )
        )
      ],
    )
  );
}
- Upload Image 버튼 클릭시 다이얼로그 팝업
takeImage(mContext) {
    return showDialog(
      context: mContext,
      builder: (context) {
        return SimpleDialog(
          shape: RoundedRectangleBorder(
            borderRadius: BorderRadius.circular(8.0),
          ),
          title: Text('New Post', style: TextStyle(
            color: Colors.black,
            fontWeight: FontWeight.bold,
          )),
          children: <Widget>[
            SimpleDialogOption(
              child: Text('Capture Image with Camera', style: TextStyle(color: Colors.black)),
              onPressed: captureImageWithCamera,
            ),
            SimpleDialogOption(
              child: Text('Select Image from Gallery', style: TextStyle(color: Colors.black)),
              onPressed: pickImageFromGallery,
            ),
            SimpleDialogOption(
              child: Text('Cancel', style: TextStyle(color: Colors.grey)),
              onPressed: () => Navigator.pop(context),
            ),
          ],
        );
      }
    );
}
- 카메라, 갤러리 버튼 클릭시 분기처리
final ImagePicker _picker = ImagePicker();
PickedFile file;

pickImageFromGallery() async {
  Navigator.pop(context);
  PickedFile imageFile = await _picker.getImage(
    source: ImageSource.gallery,
    maxHeight: 680,
    maxWidth: 970,
  );
  setState(() {
    this.file = imageFile;
  });
}

captureImageWithCamera() async {
  Navigator.pop(context);
  PickedFile imageFile = await _picker.getImage(
    source: ImageSource.camera,
    maxHeight: 680,
    maxWidth: 970,
  );
  setState(() {
    this.file = imageFile;
  });
}
- Share 버튼 클릭시 동작
- uploading 변수 확인 (true/false)
- controlUploadAndSave() : Storage에 업로드 및 DB(Firestore)에 게시글 관련 정보 저장
→ compressingPhoto() : 업로드 전 사진셋팅
→ uploadPhoto(imgFile) : Storage에 업로드 후 url 저장
→ savePostInfoToFireStore(url, location, description) : DB(Firestore)에 게시글 관련 정보 저장
→ clearPostInfo() : 업로드/저장 완료 후 uploading flag, postId, controller 등 초기화해주기
// Share 버튼 클릭
FlatButton(
  onPressed: () => uploading ? null : controlUploadAndSave(),
  child: Text('Share',
    style: TextStyle(
      color: Colors.lightGreenAccent,
      fontWeight: FontWeight.bold,
      fontSize: 15
    )
  )
),

// 업로드/저장 총괄 메소드
controlUploadAndSave() async {
  setState(() {
    uploading = true;
  });
  await compressingPhoto(); // 업로드 전 사진 준비
  String downloadUrl = await uploadPhoto(imgFile); // 업로드 후 url 저장
  savePostInfoToFireStore(url: downloadUrl, location: locationTextEditingController.text, desc: descTextEditingController.text);  // location은 에러나서 잠시 보류
  clearPostInfo();
}

// 업로드 전 사진 준비
compressingPhoto() async {
  final tDirectory = await getTemporaryDirectory(); // path_provider에서 제공
  final path = tDirectory.path; // 임시 path를 만들어서
  ImD.Image mImageFile = ImD.decodeImage(imgFile.readAsBytesSync()); // image file을 읽어서
  final compressedImageFile = File('$path/img_$postId.jpg')..writeAsBytesSync(ImD.encodeJpg(mImageFile, quality: 90)); // jpg양식의 신규파일로 만듦
  setState(() {
    imgFile = compressedImageFile;
  });
}

// 업로드 후 url 저장
Future<String> uploadPhoto(mImgFile) async {
  StorageUploadTask storageUploadTask = storageReference.child('post_$postId.jpg').putFile(mImgFile); // 파일명을 지정해서 Storage에 저장
  StorageTaskSnapshot storageTaskSnapshot = await storageUploadTask.onComplete; // 저장이 완료되면
  return await storageTaskSnapshot.ref.getDownloadURL(); // 저장된 url값을 return
}

// DB(Firestore)에 게시글 관련 정보 저장
savePostInfoToFireStore({String url, String location, String desc}) {
  postsReference.doc(widget.gCurrentUser.id).collection('usersPosts').doc(postId).set({
    'postId': postId,
    'ownerId': widget.gCurrentUser.id,
    'timestamp': timestamp,
    'likes': {},
    'username': widget.gCurrentUser.username,
    'description': desc,
    'location': location,
    'url': url
  });
}

// 업로드/저장 완료 후 uploading flag, postId, controller 등 초기화해주기
clearPostInfo() {
  uploading = false;
  postId = Uuid().v4();
  descTextEditingController.clear();
  locationTextEditingController.clear();
  setState(() {
    imgFile = null;
  });
}
* 주의할 점
- DB(Firestore)와 storage의 규칙 수정이 필요하다. (권한 없다는 에러로 업로드가 안될 수 있음)
// 아래의 코드 규칙대로 수정해줄 것 (임시방편이긴 하다)
// 수정 경로1 : Cloud Firestore > 규칙
// 수정 경로2 : Storage > 규칙
rules_version = '2';
service cloud.firestore {
  match /databases/{database}/documents {
    match /{document=**} {
      allow read, write: if
          request.time < timestamp.date(2020, 12, 31);
    }
  }
}
#3. 결과 화면


*** 혹시 잘 안되는 부분이 있다면 댓글 남겨주시기 바랍니다.
프로젝트 소스는 아래의 사이트에서 확인 가능합니다. (지속 업데이트 중이라 잘 안될 수도 있으니 참고해주세요)
https://github.com/kyungsnim/instargram_clone_by_kyungsnim
kyungsnim/instargram_clone_by_kyungsnim
인스타그램 클론 앱. Contribute to kyungsnim/instargram_clone_by_kyungsnim development by creating an account on GitHub.
github.com


댓글