반응형
오늘의 목표
프로필 페이지를 만들어보자.
내 프로필을 보는 경우, 프로필 편집 버튼이 보여야 할 것이며
다른 사용자의 프로필을 보는 경우, 팔로우 상태가 아니라면 팔로우 버튼이 보여야 하고 팔로우 상태라면 언팔로우 버튼이 보여야 할 것이다.
#1. 프로필 화면 구성
#2. 프로필 화면 결과 화면
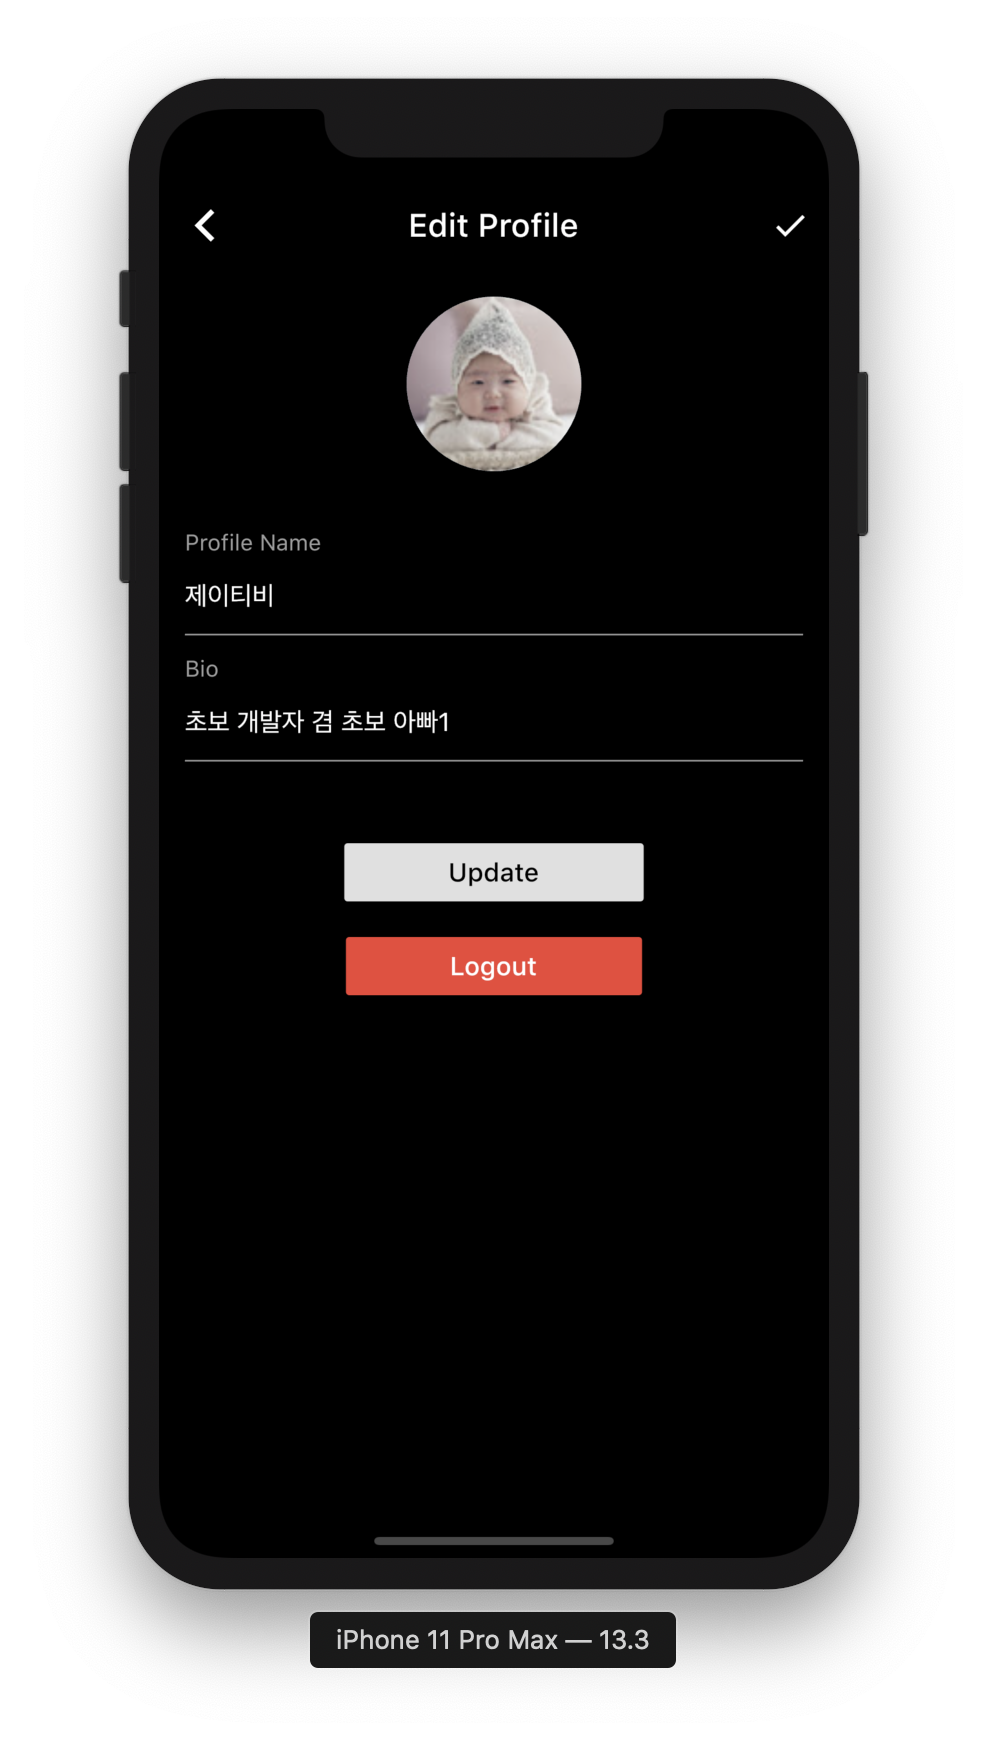
#3. 프로필 수정 화면
#4. 프로필 수정 화면 결과 화면
#1. 프로필 화면 구성
- 기본 화면 구성 중 프로필 상단부 영역
// build method
@override
Widget build(BuildContext context) {
  return Scaffold(
    appBar: header(context, isAppTitle: false, title: 'Profile',),
    body: ListView(
      children: [
        createProfileTopView(),
      ],
    )
  );
}

// 프로필 상단부 (프로필 사진, 게시글/팔로워/팔로잉수, Edit profile/follow/unfollow 버튼
createProfileTopView() {
  return FutureBuilder(
    // 현재 로그인한 유저의 정보로 DB 데이터 가져오기
    future: userReference.doc(widget.userProfileId).get(),
    builder: (context, dataSnapshot) {
      // 가져오는 동안 Progress bar
      if(!dataSnapshot.hasData) {
        return circularProgress();
      }

      // 가져온 데이터로 User 인스턴스에 담기
      User user = User.fromDocument(dataSnapshot.data);
      return Padding(
        padding: EdgeInsets.all(17),
        child: Column(
          children: [
            Row(
              children: [
                CircleAvatar(
                  radius: 45,
                  backgroundColor: Colors.grey,
                  backgroundImage: CachedNetworkImageProvider(user.url),
                ),
                Expanded(
                  flex: 1,
                  child: Column(
                    children: [
                      Row(
                        mainAxisSize: MainAxisSize.max,
                        mainAxisAlignment: MainAxisAlignment.spaceEvenly,
                        children: [
                          // 게시글, 팔로워, 팔로잉 수 (임시로 숫자 박아놓자)
                          createColumns('posts', 124),
                          createColumns('followers', 1230),
                          createColumns('following', 1100),
                        ],
                      ),
                    ],
                  )
                )
              ],
            ),
            SizedBox(height: 10),
            Row( // 사용자 이름
              mainAxisAlignment: MainAxisAlignment.start,
              children: [
                Text(user.username, style: TextStyle(color: Colors.white, fontSize: 16),),
              ],
            ),
            Row( // 상황에 따라 Edit profile, follow, unfollow 버튼으로 분기처리
              mainAxisAlignment: MainAxisAlignment.spaceEvenly,
              children: [
                createButton(),
              ],
            )
          ],
        ),
      );
    }
  );
}
- 게시물 수, 팔로워, 팔로잉
// 게시글/팔로워/팔로잉
Column createColumns(String title, int count) {
  return Column(
    mainAxisSize: MainAxisSize.max,
    mainAxisAlignment: MainAxisAlignment.center,
    children: [
      Text(
        '$count',
        style: TextStyle(fontSize: 20, color: Colors.white, fontWeight: FontWeight.bold),
      ),
      Container(
        margin: EdgeInsets.only(top: 5),
        child: Text(
          title,
          style: TextStyle(fontSize: 16, color: Colors.grey, fontWeight: FontWeight.w400),
        ),
      )
    ],
  );
}
- 프로필 편집
// 팔로우/언팔로우 상태에 따라 보여줘야 함
createButton() {
  bool ownProfile = currentOnlineUserId == widget.userProfileId; //
  if(ownProfile) { // 본인의 프로필을 보려는 경우
    return createButtonTitleAndFunction(title: 'Edit Profile', performFunction: editUserProfile,);
  } else {
    // return
  }
}

// 본인의 프로필인 경우 Edit Profile 버튼을 보여주고, 그에맞게 동작하도록 구
createButtonTitleAndFunction({String title, Function performFunction}) {
  return Container(
    padding: EdgeInsets.only(top: 3),
    child: FlatButton(
      onPressed: performFunction,
      child: Container(
        width: MediaQuery.of(context).size.width * 0.8,
        height: MediaQuery.of(context).size.height * 0.03,
        child: Text(title, style: TextStyle(color: Colors.grey, fontWeight: FontWeight.bold),),
        alignment: Alignment.center,
        decoration: BoxDecoration(
          color: Colors.black,
          border: Border.all(color: Colors.grey),
          borderRadius: BorderRadius.circular(6)
        ),
      ),
    ),
  );
}

// 버튼 클릭시 Edit 페이지로 전환
editUserProfile() {
  Navigator.push(context, MaterialPageRoute(
    builder: (context) => EditProfilePage(currentOnlineUserId: currentOnlineUserId),
  ));
}
#2. 프로필 화면 결과화면

#3. 프로필 수정 화면
- 수정 페이지 들어오면 사용자 정보를 읽어와서 해당 값들로 셋팅해주자 (initState)
@override
void initState() {
  super.initState();

  // 화면 빌드 전 미리 해당 사용자의 값들로 셋팅해주자
  getAndDisplayUserInformation();
}

getAndDisplayUserInformation() async {
  setState(() {
    loading = true;
  });

  // DB에서 사용자 정보 가져오기
  DocumentSnapshot documentSnapshot = await userReference.doc(widget.currentOnlineUserId).get();
  user = User.fromDocument(documentSnapshot);

  // profile, bio 입력란에 사용자 정보로 채워주기
  profileNameTextEditingController.text = user.profileName;
  bioTextEditingController.text = user.bio;

  // 셋팅 끝나면 loading은 false로 바뀌고 화면에 값들이 보임
  setState(() {
    loading = false;
  });
}
- 화면 build 부분, 실제 수정페이지에 들어가면 profileName, bio 수정할 수 있도록 미리 사용자값으로 셋팅한다.
@override
Widget build(BuildContext context) {
  return Scaffold(
    key: _scaffoldGlobalKey,
    appBar: AppBar(
      backgroundColor: Colors.black,
      iconTheme: IconThemeData(color: Colors.white),
      title: Text('Edit Profile', style: TextStyle(color: Colors.white),),
      actions: [
        IconButton(icon: Icon(Icons.done, color: Colors.white,),
          // profileName, bio값이 수정되므로 완료버튼 클릭시 ProfilePage를 새로 build 해주자.
          onPressed: () => Navigator.pushReplacement(context, MaterialPageRoute(
            builder: (context) => ProfilePage(user.id)))
        ),
      ],
    ),
    body: loading ? circularProgress() : ListView(
      children: [
        Container(
          child: Column(
            children: [
              Padding(
                padding: EdgeInsets.only(top: 16, bottom: 7),
                child: CircleAvatar(
                  radius: 54,
                  backgroundImage: CachedNetworkImageProvider(user.url),
                ),
              ),
              Padding(
                padding: EdgeInsets.all(16),
                child: Column(children: [
                  createProfileNameTextFormField(),
                  createBioTextFormField(),
                ],),
              ),
              Padding(
                padding: EdgeInsets.only(top: 29, left: 30, right: 30),
                child: RaisedButton(
                  onPressed: updateUserData,
                  child: Text(
                    '           Update           ',
                    style: TextStyle(color: Colors.black, fontSize: 16),
                  )
                )
              ),
              Padding(
                  padding: EdgeInsets.only(top: 10, left: 30, right: 30),
                  child: RaisedButton(
                    color: Colors.red,
                    onPressed: logoutUser,
                    child: Text(
                      '           Logout           ',
                      style: TextStyle(color: Colors.white, fontSize: 16),
                    )
                  )
              )
            ],
          )
        )
      ],
    )
  );
}

logoutUser() async {
  await googleSignIn.signOut();
  Navigator.pushReplacement(context, MaterialPageRoute(
    builder: (context) => HomePage()
  ));
}

createProfileNameTextFormField() {
  return Column(
    crossAxisAlignment: CrossAxisAlignment.start,
    children: [
      Padding(
        padding: EdgeInsets.only(top: 13),
        child: Text('Profile Name', style: TextStyle(color: Colors.grey),),
      ),
      TextField(
        style: TextStyle(color: Colors.white),
        controller: profileNameTextEditingController,
        decoration: InputDecoration(
          hintText: 'Write profile name here...',
          enabledBorder: UnderlineInputBorder(
            borderSide: BorderSide(color: Colors.grey)
          ),
          focusedBorder: UnderlineInputBorder(
              borderSide: BorderSide(color: Colors.white)
          ),
          hintStyle: TextStyle(color: Colors.grey),
          errorText: _profileNameValid ? null : 'Profile name is very short'
        ),
      )
    ],
  );
}

createBioTextFormField() {
  return Column(
    crossAxisAlignment: CrossAxisAlignment.start,
    children: [
      Padding(
        padding: EdgeInsets.only(top: 13),
        child: Text('Bio', style: TextStyle(color: Colors.grey),),
      ),
      TextField(
        style: TextStyle(color: Colors.white),
        controller: bioTextEditingController,
        decoration: InputDecoration(
            hintText: 'Write Bio here...',
            enabledBorder: UnderlineInputBorder(
                borderSide: BorderSide(color: Colors.grey)
            ),
            focusedBorder: UnderlineInputBorder(
                borderSide: BorderSide(color: Colors.white)
            ),
            hintStyle: TextStyle(color: Colors.grey),
            errorText: _bioValid ? null : 'Bio is very long'
        ),
      )
    ],
  );
}
#4. 프로필 수정 화면 결과 화면


*** 혹시 잘 안되는 부분이 있다면 댓글 남겨주시기 바랍니다.
프로젝트 소스는 아래의 사이트에서 확인 가능합니다. (지속 업데이트 중이라 잘 안될 수도 있으니 참고해주세요)
https://github.com/kyungsnim/instargram_clone_by_kyungsnim
kyungsnim/instargram_clone_by_kyungsnim
인스타그램 클론 앱. Contribute to kyungsnim/instargram_clone_by_kyungsnim development by creating an account on GitHub.
github.com
반응형


댓글